Restaking Developer Guide
Smart Contract Restaking allows the user to interact directly with the EigenLayer core contracts. The following sections describe how to setup your Restaking integration with the EigenLayer contracts directly with no reliance on the EigenLayer Web App.
Key EigenLayer Protocol references for this guide:
- Source Code: for all the following references to EigenLayer core contracts and functions, please see the src/contracts folder for their source code.
- Developer Documentation (specifications): detailed protocol specifications for restaking smart contract integration developers.
- Deployed Contract Addresses: deployed contract addresses for Mainnet and Testnet.
- Integration Tests: tests that serve as examples on how to interact with the EigenLayer core contracts.
Liquid Restaking Guide
The following sections describe the steps to Restake "liquid" tokens (including LSTs EIGEN token, and any ERC20 token).
Deposit (Restake) Liquid Tokens
- For the token being deposited, invoke ERC20(token).approve(StrategyManager, amount) to authorize EigenLayer contracts before depositing.
- Invoke
StrategyManager.depositIntoStrategy().- Parameters:
strategy- use the address of the deployed strategy (example list here).token- use the address of the token associated with that strategy.
- Parameters:
- User is now actively Restaked.
Withdraw (Unstake) Liquid Tokens
-
Queue Withdrawal: invoke
DelegationManager.queueWithdrawal()to trigger the escrow period. Wait for Escrow Period: 7 days. Please see further detail here.- Parameters: please see the QueuedWithdrawalParams
strategy- use the address of the deployed strategy (example list here).shares- the number of shares in the given strategy. Note this parameter is not meant to reference the amount of the underlying token. Invoke[Strategy].underlyingToShares()and[Strategy].sharesToUnderlying()as needed to convert their current balances between strategy shares and underlying token amounts.
-
Complete Withdrawal as Tokens: invoke
DelegationManager.completeQueuedWithdrawal()to complete the withdrawal and return assets to the withdrawer's wallet.
Smart Contract Delegation User Guide
The process of Delegating assets is the same for both liquid and native restaked assets. The user's Restaking wallet must Delegate all restaked assets to a single Operator. After the initial Delegate operation - any subsequent Deposited (Restaked) assets are also automatically delegated to the current operator.
Delegate Assets
- Invoke
DelegationManager.delegateTo(). Please observe the following notes on the parameters: a. operator: the address of the operator you want to delegate to. b. approverSignatureAndExpiry: can be left blank. c. approverSalt: can be left blank. - Your Restaked assets are now delegated.
Change Actively Delegated Operator
The following steps are necessary for a Restaker to move their Delegated balance to a New Operator. The process below requires users to perform each of the following steps in order:
- Undelegate assets, which
- Redeposit each asset.
- Delegate to the new Operator.
- Undelegate: invoke
DelegationManager.undelegate().- Note: this action automatically queues a withdrawal. The Undelegate and Queue Withdrawal transactions are intenionally combined due to the security architecture of EigenLayer smart contracts.
- Wait for the Escrow Period to complete.
- Invoke DelegationManager.completeQueuedWithdrawal(). Important: you will choose to complete the withdrawal as shares, which is effectively a redeposit action.
receiveAsTokensshould be set to false.
- Invoke
DelegationManager.delegateTo()to delegate your restaked assets to the new Operator.
Native Restaking Guide
The following instructions describe how to Restake validator ETH. This mechanism is referred to as "Native Restaking".
For users planning to restake multiple validators, we recommend they connect many validators to a single EigenPod in order to reduce cost and complexity where possible. "Generate Proof Via eigenpod-proofs-generation CLI" will prove all connected validators.
Native Restaking consists of the following actions:
- Restake New Validator Native Beacon Chain ETH
- Convert Consensus Rewards to Restaked Shares
- Withdraw Validator Restaked Balance
- Withdraw Yield Only
PEPE Release
EigenLayer core contracts have had two previous major releases: M1 and M2. PEPE (Protocol: EigenPod Enhancement upgrade) is the current major release that focuses primarily on enhancements to Native Restaking and EigenPod design. The PEPE release will result in significantly lower gas fees and great compatibility with future scheduled Ethereum network upgrades.
The PEPE release takes advantage of a new Checkpoint Proof system to convert native validator ETH and validator yield to actively restaked shares. These proofs are initiated prior to any Restaking or Withdrawal action and are necessary to prove the expected funds are deposited in the EigenPod and/or validator. Checkpoint proofs are a two step process consisting of:
- Staring a Checkpoint: this step occurs once.
- Verify (and Completing) a Checkpoint: this step occurs multiple times until all of the remaining unproven ETH balance in the EigenPod has been proven.
Please see the this document and PR #515 for a design history and motivation for the PEPE Release.
EigenPod Upgrades and Pending Consensus Rewards
For all M1 to PEPE migrations - we no longer require users to upgrade their EigenPod contracts per the deprecated activateRestaking() method. M1 pods will be upgraded automatically to PEPE compliant EigenPods by EigenLabs.
The delayed withdrawal router is being deprecated with the PEPE release, but will remain functional. It will not receive new consensus rewards from EigenPods, however if you have existing rewards you may continue to claim them as they become claimable.
To claim consensus rewards invoke DelayedWithdrawalRouter.claimDelayedWithdrawals().
References:
- DelayedWithdrawalRouter.claimDelayedWithdrawals
- Contract Deployment Addresses: find the Proxy address of DelayedWithdrawalRouter here.
Eigen Labs will push through any rewards that are still in the delayed withdrawal router 7 days after the PEPE upgrade (after which point all rewards in there will be claimable). So if you haven’t claimed by this point, we’ll automatically process those claims on your behalf and send them to the wallet of the EigenPod owner.
Key Management and EigenPod Proof Submitter
EigenLayer Native Restaking requires submitting proofs to EigenLayer contracts to prove the amount of validator ETH is active and its withdrawal address is pointing to the EigenPod. For users who do not wish to include the "EigenPod Owner" (aka The EigenPod generation key) in their proof generation commands, you may identify another wallet as the Proof Submitter and delegate its privilege to submit proofs on its behalf using the assign_submitter command. At any point in the future the sender of the proof can be the assigned submitter. The EigenPod owner can also designate a new Proof Submitter as needed.
Use the following command to assign a submitter for your EigenPod:
/cli assign-submitter --execNode $NODE_ETH --podAddress $EIGENPOD_ADDRESS --sender $EIGENPOD_OWNER_PK
Consider using a cold key for the EigenPod Owner role. This key should be stored securely and used infrequently. For cold keys, we recommend using hardware wallets (e.g., Ledger, HSMSs) or smart contract multisigs (e.g., Safe).
We strongly recommend using a seperate key for the Proof Submitter, which can be considered a hot key. The Proof Submitter is any other address approved to submit proofs on behalf of the EigenPod owner. This separation allows the EigenPod owner key to remain secure and cold. Hot keys, while less secure, can be managed with solutions like Vault (Hashicorp) or environment variables. It is crucial not to store any meaningful value in your hot keys as operational keys are considered less secure.
Restake New Validator Native Beacon Chain ETH
The steps below are only required for new validator native beacon chain ETH. Any validator native beacon chain ETH that was restaked prior to the PEPE release will not need to repeat these steps.
Prerequisites
The user will need an environment available to run the EigenPod Proof Gen CLI including its software prerequisites.
Part 1: Create EigenPod
Invoke EigenPodManager.createPod().
Part 2: Configure Validator(s) Withdrawal Credentials
-
Configure the validator(s) credentials to point to the EigenPod address when the validator is created. Please see Ethereum Launchpad for more information. a. Optional: you may choose to set the FEE_RECIPIENT to your EigenPod address if you wish to Restake those fees.
-
Wait for the validator(s) to become active on-chain. Please see https://beaconcha.in/ to follow your validator status.
-
Run the
statuscommand via the EigenPod Proofs Generation CLI. The command will confirm the withdrawal address is set correctly and the validator is active on the beacon chain.
Part 3: Link the Validator to the EigenPod via Proof Generation
-
Run the
credentialscommand via the EigenPod Proofs Generation CLI. -
Invoke the
credentialscommand with the--sender $EIGENPOD_OWNER_PKargument so that CLI will submit proofs and act onchain for you. This is the private key of the wallet that was used to create the EigenPod. Example here:
./cli credentials --execNode $NODE_ETH --beaconNode $NODE_BEACON --podAddress $EIGENPOD_ADDRESS --sender $EIGENPOD_OWNER_PK
-
Invoke the
statuscommand to confirm restaked shares increased by the anticipated amount. -
Your validator ETH balance is now Restaked.
Convert Consensus Rewards to Restaked Shares
As of the PEPE release, users can now convert consensus rewards and validator execution fees to restaked shares. Initiating and completing a checkpoint proof will automatically convert any consensus rewards to restaked shares for the EigenPod.
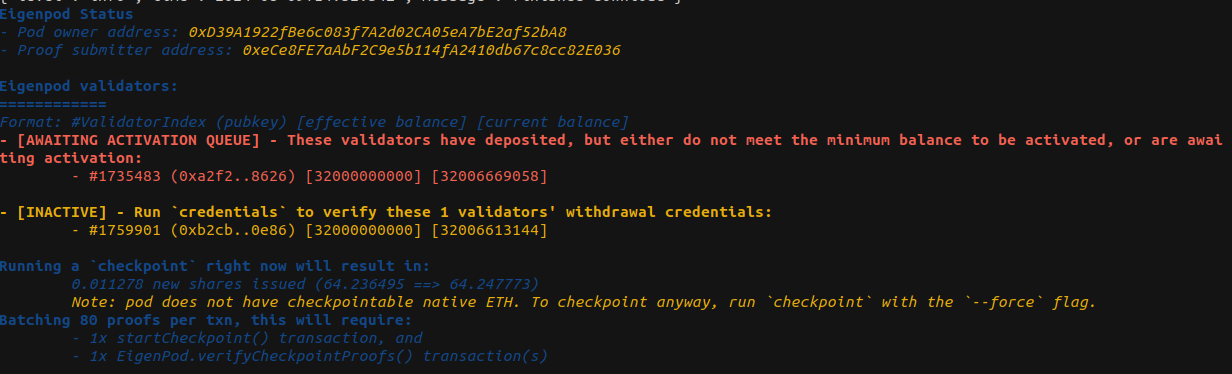
- Check the status command via
./cli statusto determine how many additional shares the user would gain from completing a checkpoint at this time. - Generate checkpoint proof via eigenpod-proofs-generation CLI in order to initiate and complete a checkpoint. This command will both start the checkpoint and run verify proofs until the checkpoint is completed.
Checkpoint Frequency
Users should not initiate a checkpoint more frequently than once every two weeks (approximately). The longer you wait before performing a checkpoint, the more gas users will save. The gas cost of a checkpoint is the same, regardless of how many consensus rewards will be proven. Each user should determine the best interval to fit their gas cost and restaking benefit needs.
Consensus rewards are moved from the beacon chain to your EigenPod once every approximately 8 days per the Ethereum protocol. Checkpoint intervals more frequently than 8 days would result in no benefit for the user.
Withdraw Validator Restaked Balance
- Validator Exit
- Fully exit the Validator. You may monitor its activity via beaconcha.in/validator/[yourvalidatorid] .
- Wait for the final beacon chain withdrawal to be deposited to your EigenPod. There can be a lag of up to 24 hours to 7 days between the validator appearing as "exited" and the withdrawal amount deposited to EigenPod. Please see the "Withdrawals" tab and "Time" column for your validator via beaconcha.in/validator/[yourvalidatorid]#withdrawals . The ETH will then be recognized in the EigenPod.
- Generate checkpoint proof via eigenpod-proofs-generation CLI in order to initiate and complete a checkpoint.
- Determine the number of shares available to withdraw.
- Invoke
[YourEigenPodContract].withdrawableRestakedExecutionLayerGwei()to get the number amount of withdrawable execution layer ETH in Gwei. - Convert the Gwei to Wei (multiply by by 10^9 or 1,000,000,000).
- Invoke
- Invoke the
DelegationManager.queueWithdrawal()function.- This function can only be invoked by the EigenPod Owner wallet.
- Parameters: please see the QueuedWithdrawalParams
- strategies - use the Beacon chain ETH strategy (
0xbeaC0eeEeeeeEEeEeEEEEeeEEeEeeeEeeEEBEaC0). - shares - use the amount of withdrawableRestakedExecutionLayerGwei converted to Wei in the steps above.
- Wait for the Escrow Period to complete.
- Invoke
DelegationManager.completeQueuedWithdrawal().
Withdraw Yield Only
This process is intended to allow users to withdraw yield (beacon chain consensus rewards, execution fees, and ETH) from the EigenPod.
Determine the number of shares available to withdraw. This step is an optional convenience to avoid attempting to queue a withdrawal for more shares than allowed.
- Invoke
EigenPod.withdrawableRestakedExecutionLayerGwei(). Note: the resulting number of shares returned are in units of Gwei. Gwei is the deafult measure used by the Beacon chain to store balances. - Convert the resulting Gwi to Wei. Multiple the amount in Gwei * 1 billion (1e9).
- The amount in Wei represents the number of shares available to withdraw.
Withdraw yield shares amount:
- Generate checkpoint proof via eigenpod-proofs-generation CLI in order to initiate and complete a checkpoint.
- Invoke the
DelegationManager.queueWithdrawal()function with the amount of the yield to be withdrawn. This function can only be invoked by the EigenPod Owner wallet.- This function can only be invoked by the EigenPod Owner wallet.
- Parameters: please see the QueuedWithdrawalParams
- strategies - use the Beacon chain ETH strategy (
0xbeaC0eeEeeeeEEeEeEEEEeeEEeEeeeEeeEEBEaC0).
- Wait for the Escrow Period to complete.
- Invoke
DelegationManager.completeQueuedWithdrawal(). This function can only be invoked by the EigenPod Owner wallet.
FAQ
Queue withdrawal takes an amount as input, what will that value be?
The input amount for DelegationManager.queueWithdrawal() can be any amount you like. However, it must be less than or equal to withdrawableRestakedExecutionLayerGwei. The value of withdrawableRestakedExecutionLayerGwei will equal any checkpointed yield (consensus rewards, fees, ETH) and any checkpointed exited validator native eth that has been withdrawn to the EigenPod.
How to account for the exchange rates between Strategy token amounts and shares?
Invoke [Strategy].underlyingToShares() and [Strategy].sharesToUnderlying() as needed to convert their current balances between shares and underlying token amounts.